Cloning Marijuana

Whatever grow system you use, you are bound to use clones sooner or later.
By Breeder Steve
of the Spice of Life Seed Co.
Many novice growers ask themselves “should I start from seed or should I grow some clones?” It’s a good question, and one that deserves serious consideration.

Growing from clones means that you will harvest more bud sooner. Many people who start a garden these days know someone who will give them a few clones for the simple pleasure of sharing a good thing. Some people sell clones, often growing an exclusively vegetative garden without ever flowering. These clonemeisters keep a variety of select mothers from high-quality strains, and grow them on a continuous eighteen hour light cycle. They can make good money selling trays of cuttings, either rooted or simply fresh cut. Rooted clones are more expensive than fresh cuttings.
Cuttings versus seeds
Many people opt to purchase a tray of cuttings when starting out, so they get a faster return on their investment. This is sensible, but there is no substitute for learning, and growing from seed teaches you more about the plant. Growing from seed, especially from high numbers of seeds, allows for the selection of a particular plant that best suits your needs.
I always tell people who start from seed to be sure to take two clones from the bottom of each plant just before putting the plants into flower. These clones should be labeled with the same number as the mother plant from which it was taken, as well as the date it was cut. Keep those clones alive!
When you see which plant produces the best buds and is most worthy of your precious grow space, take the corresponding clones and grow them large under your metal halide on an eighteen hour light cycle. Your next crop can be all cuttings from your favourite plant. This harvest will be much more uniform than the last one, and this will improve the quality and quantity of your yield.
If you grow you should eventually cut and root your own clones. There are many ways to take clones, and I am going to share the simple procedure that I use to take mine. It’s easy to do, especially once you get a feel for it.
 How to take the cutting
To get started you will need: a clean razor blade, a water mister, a tray with a clear plastic lid, a planting medium, and perhaps a jar of rooting hormone. Clones can be effectively rooted using nothing more than water, however most growers choose to dip their freshly cut stem into either a rooting powder or a gel.
Many growers cut the branch underwater so that no air bubbles will form in the stem of the new cutting. If air enters the stem it will prevent the stem from carrying water and the cutting will die. Dipping the cut end of the stem immediately into a rooting gel also solves the air bubble problem. If using a powder the cuttings must be wet so that the powder will adhere.
Use a toothpick or a nail to poke a hole in the planting medium, to ease the entry of the cut stem. It is important not to crush or bend the tender stem at all. Try and make the hole about the same size as the stem to be inserted.
When you have your tools and accessories ready and have soaked your medium, you should select a soft, small branch from the bottom of the plant, one that wouldn’t amount to much anyway. If you are planning to keep the plant in vegetative growth to continue taking cuttings then you should take cuttings from any shoots that have two or three nodes. I take cuttings that are between two and four inches long, but some people prefer to take cuttings as long as eight inches.
The stem will root quickly if it is still soft and green, not woody. Make an even, diagonal slice through the branch with your clean razor, below the would-be cutting. Strip the bottom leaves off of the cutting, dip it in rooting gel and plant it.
If you make your cut right above a node on the branch then two new branches will sprout out as if it had been pinched. If you continue in this fashion then your mother will produce an exponential number of cuttings every two weeks. You will soon be proudly giving clones away to your friends (or maybe Sell them).
 How to root your cuttings
So now you’ve cut and dipped your first batch of clones, stuck them in a medium, misted them, and put the clear plastic lid on the tray. Now put the tray under fluorescent lights, about six inches away to start with, moving them a little closer every few days.
I’ve rooted clones on the floor in my bedroom, and in many a veg room in the shade of a leafy mother. Both provide decent ambient light and a good temperature range. 24¡C is optimum temperature, but my experience is that as long as it’s close to that it’ll do. The clones must be warm but not scorched. Direct light will burn them because without roots the stem cannot supply the leaves with enough water to match the leaves’ rate of transpiration.
Transpiration is a part of how the plant grows. Water and nutrients travel up the stem from the roots to the leaves, where they are used in photosynthesis. Tiny hairs called stomata sweat out the moisture to allow the stream of nutrients to continue flowing. Wind aids in transpiration by blowing the moisture off the stomata, which is why the lid is so important.
Another way to protect the stomata is to spray a light wax onto the cuttings. This slows transpiration to the point where you don’t even need a lid, and the waxy coating serves as a protection against pests. I suggest you just try using a lid at first.
Remove the lid once a day and fan the cuttings with it for a few seconds. I also like to cut small holes into the corners of the lid so that there is a little ventilation, and I usually put holes into the corners of the tray to allow for drainage if the plants are over-watered. The roots need oxygen to thrive and survive.
 Supplements & supplies
Oasis Foam is my favourite medium because it is so airy and quick to dry, and it has the added bonus of having a neutral pH balance. Olivia’s is my favourite rooting gel, although I’ve tried many and they all work. I find that just soaking the tray before planting is usually sufficient to sustain the cuttings until they are rooted.
There are a number of nutritional additives that may be added to this soaking, but my experience is that they are not essential. You might try Spray & Thrive, Nutriboost, Powerthrive, Superthrive, Olivia’s cloning solution, a mild seaweed solution, or a plethora of other products. Plain water works well too.
after cutting care
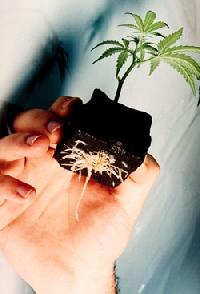
When the tray feels light water it. If the plants look dry, mist them. Check the bottom for roots after three days. Some strains will root this fast, while others may take up to ten days, or even two weeks. When roots are showing out of the sides and bottom of the medium it is time to transplant them into whatever medium you choose to grow them in.
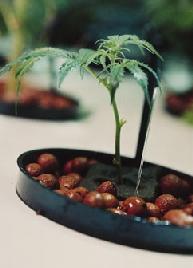
Generally, your medium will be a pot with a well drained soil mixture, or one of any number of soilless cultures. The latter are definitely an improvement over soil when it comes to speed of production and overall yield, but it is much easier to grow marijuana in soil.
It is not that difficult to set up and operate a hydroponic system, but one detail like a faulty irrigation timer can cause devastation if not immediately corrected.
The hydroponic solution must be monitored closely and kept balanced, while a well prepared soil solution may not need any additional fertilizers for the entire life of the plant. As long as you water the soil when it gets dry the plant will thrive and be happy.
Soil-grown pot is considered by many to have a more palatable taste than hydroponically grown herb, but there are always exceptions to such rules. Some growers get the best of both worlds by experimenting with organic hydroponics, but most use basic stock solutions that contain fertilizer salts in a readily available form. These salts are easy to administer in tried-and-true formulas, but the problem is that these stock solutions tend to leave a metallic taste in the precious produce. Experienced growers know to leach their plants before harvest to remove residual salts from the buds, but it appears that few bother to leach sufficiently for a truly clean, pure taste.
A milder feed solution will prevent the build-up of excess fertilizer salts in the bud. Leaching time varies from grower to grower, from two days to two weeks. Some use plain or distilled water, others simply use a very diluted feed solution.
 Clones are fantastic
Whatever grow system you use, you are bound to use clones sooner or later. They can greatly improve the efficiency of your growing area, and are a fantastic way to preserve your favourite plants.
An exceptional plant can be rejuvenated and cloned even after it has flowered and been harvested. If a small amount of vegetative matter is left growing on the bottom of the plant and it is placed under an eighteen hour light cycle then all the little nuggets will stretch into vegetative shoots, which may then be cloned and grown into a full mother plant, which can be cloned indefinitely. This will provide you with many uniform harvests of your favourite plant.
Happy cloning!

Thanks to:
http://www.cannabisculture.com/backissues/cc07/